Creating a Photos page with Unsplash and Next.js Server Actions
Quick tutorial for fetching and displaying the unsplash api
Table of Contents
Unsplash is one of the best places to find high-quality images online. Over the years, I have used it so much that I decided to contribute my photographs to Unsplash. Inspired by the photos section of Adem Ilter's website. I decided to add a photos page to my site. Let's get started with the planning.
These are the steps we need to follow, one by one. This is not a quick tutorial; we will need to wait for approvals at several stages.
Steps to Follow:
- Creating an Unsplash Account
- Submitting some photos and waiting for the publishing
- Creating an application on Unsplash Developers to get an API Key.
- Creating server actions
- Fetching and displaying the data
- Creating the Parallax Component
Starting the coding part
First, define the Unsplash API Key in the env.development file. Additionally, add this to the env.production file or set environment variables in Vercel or other platforms.
UNSPLASH_ACCESS_KEY= Get the key from unsplah developer's application page. This will be the Access Key.Creating server actions
Next, let's create our server actions. Create a folder named actions in the root directory. Inside this folder, create a file named unsplash.ts.
async function getData(url: string) {
  const res = await fetch(url, {
    method: "GET",
  });
  if (!res.ok) {
    throw new Error(`Error fetching data from Unsplash: ${res.statusText}`);
  }
  return await res.json();
}

export async function getStats() {
  const base_url = "https://api.unsplash.com/users/haskup/statistics";
  const url = `${base_url}?client_id=${process.env.UNSPLASH_ACCESS_KEY}`;
  return await getData(url);
}

export async function getPhotos(per_page = 50) {
  const base_url = "https://api.unsplash.com/users/haskup/photos";
  const url = `${base_url}?per_page=${per_page}&client_id=${process.env.UNSPLASH_ACCESS_KEY}`;
  return await getData(url);
}
Fetching and displaying the data
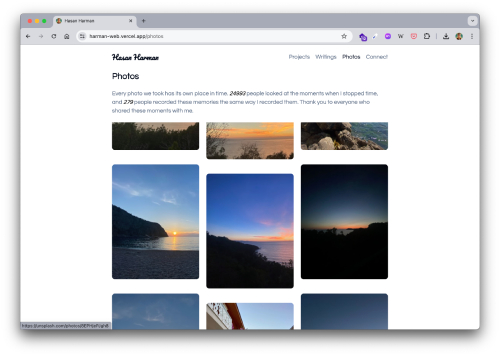
I want to display the statistics and photos like in the example website. The following functions will suffice for these purposes. If you want to extend the example, you can refer to the documentation.
Create another folder inside the /app directory and name it photos. Then, create a page.tsx file to list and show the photos and statistics.
import React from "react";

import { getStats, getPhotos } from "@/actions/unsplash";
import { ParallaxScroll } from "@/components/parallax-scroll";

export default async function Photos() {
  try {
    const stats = await getStats();
    const photos = await getPhotos();

    const views = stats?.views?.total;
    const downloads = stats?.downloads?.total;

    return (
      <div className="space-y-5">
        <h1 className="text-2xl font-semibold">Photos</h1>
        <p className="text-muted-foreground font-light">
          Every photo we took has its own place in time.{" "}
          <span className="text-black italic">{views}</span> people looked at
          the moments when I stopped time, and{" "}
          <span className="text-black italic">{downloads}</span> people recorded
          these memories the same way I recorded them. Thank you to everyone who
          shared these moments with me.
        </p>
        <ParallaxScroll images={photos} />
      </div>
    );
  } catch (error: any) {
    return (
      <div>
        <h1>Error</h1>
        <p>{error.message}</p>
      </div>
    );
  }
}
Creating the Parallax Component
We retrieve the data using the getStats() and getPhotos() actions. I created a ParallaxScroll component to enhance the photo gallery display. We will pass the photos array to the ParallaxScroll component, which was created by Manu Arora founder of Acernity UI. One of the best UI component libraries online.
"use client";
import { useScroll, useTransform } from "framer-motion";
import { useRef } from "react";
import { motion } from "framer-motion";
import Image from "next/image";
import { cn } from "@/lib/utils";
import Link from "next/link";

export const ParallaxScroll = ({
  images,
  className,
}: {
  images: string[];
  className?: string;
}) => {
  const gridRef = useRef<any>(null);
  const { scrollYProgress } = useScroll({
    container: gridRef, // remove this if your container is not fixed height
    offset: ["start start", "end start"], // remove this if your container is not fixed height
  });

  const translateFirst = useTransform(scrollYProgress, [0, 1], [0, -200]);
  const translateSecond = useTransform(scrollYProgress, [0, 1], [0, 200]);
  const translateThird = useTransform(scrollYProgress, [0, 1], [0, -200]);

  const third = Math.ceil(images.length / 3);

  const firstPart = images.slice(0, third);
  const secondPart = images.slice(third, 2 * third);
  const thirdPart = images.slice(2 * third);

  return (
    <div
      className={cn("h-screen items-start overflow-y-auto w-full", className)}
      ref={gridRef}
    >
      <div
        className="grid grid-cols-1 md:grid-cols-2 lg:grid-cols-3 items-start gap-5"
        ref={gridRef}
      >
        <div className="grid gap-10">
          {firstPart.map((el: any, idx: any) => (
            <Link href={el.links.html} target="_blank" key={"grid-1" + idx}>
              <motion.div
                style={{ y: translateFirst }} // Apply the translateY motion value here
              >
                <Image
                  src={el.urls.small}
                  className="h-80 w-full object-cover object-left-top rounded-lg gap-10 !m-0 !p-0"
                  height="400"
                  width="400"
                  alt="thumbnail"
                />
              </motion.div>
            </Link>
          ))}
        </div>
        <div className="grid gap-10">
          {secondPart.map((el: any, idx) => (
            <Link href={el.links.html} target="_blank" key={"grid-2" + idx}>
              <motion.div style={{ y: translateSecond }} key={"grid-2" + idx}>
                <Image
                  src={el.urls.small}
                  className="h-80 w-full object-cover object-left-top rounded-lg gap-10 !m-0 !p-0"
                  height="400"
                  width="400"
                  alt="thumbnail"
                />
              </motion.div>
            </Link>
          ))}
        </div>
        <div className="grid gap-10">
          {thirdPart.map((el: any, idx) => (
            <Link href={el.links.html} target="_blank" key={"grid-3" + idx}>
              <motion.div style={{ y: translateThird }} key={"grid-3" + idx}>
                <Image
                  src={el.urls.small}
                  className="h-80 w-full object-cover object-left-top rounded-lg gap-10 !m-0 !p-0"
                  height="400"
                  width="400"
                  alt="thumbnail"
                />
              </motion.div>
            </Link>
          ))}
        </div>
      </div>
    </div>
  );
};
The code is mostly self-explanatory, but I strongly recommend reading the documentation for the Framer Motion library.
Here's how the page looks:
 That's all for now. Feel free to email me if you have any questions or need further assistance.
You can view the live page here. The source code is available here. Follow the file names to check the implementation.